k8s-ELK日志收集实践

日志收集简介

日志收集的目的:

  • 分布式日志数据统一收集,实现集中式查询和管理
  • 故障排查
  • 安全信息和事件管理
  • 报表功能

日志收集的价值:

  • 日志查询,问题排查,故障恢复,故障自愈
  • 应用日志分析,错误报警
  • 性能分析,用户行为分析

日志收集流程

本次实践中用到的相关组件有

  • zookeeper
  • kafka
  • elk
  • k8s
  • Tomcat

日志收集方式简介

在k8s里有以下三种模式来收集pod的日志

  • 1.node节点收集,基于daemonset部署日志收集进程,实现json-file类型(标准输出/dev/stdout、错误输出/dev/stderr)日志收集。
  • 2.使用sidcar容器(一个pod多容器)收集当前pod内一个或者多个业务容器的日志(通常基于emptyDir实现业务容器与sidcar之间的日志共享)。
  • 3.在容器内置日志收集服务进程。

在本次实践中采用的是第3种模式,把日志收集服务塞到容器内部里去同时运行

构建镜像

构建tomcat镜像

提前用到的Tomcat-base镜像文件需要提前构建好,还有filebeat这里用的是filebeat-7.14.0-amd64.deb包,这里需要准备好filebeat、Tomcat的server.xml、catalina.sh配置文件还有要测试的业务服务(注意: 所有容器镜像基于ubuntu:20.04构建)

1
2
3
4
5
6
7
8
9
10
11
12
13
14
15
16
17
18
19
20
21
22
23
24
25
26
27
28
29
30
31
root@k8s-master-32:~# vim Dockerfile
FROM 10.200.17.42/base-image/tomcat-base:8.5.100

ADD filebeat-7.14.0-amd64.deb /tmp/
RUN cd /tmp && dpkg -i filebeat-7.14.0-amd64.deb
ADD catalina.sh /app/tomcat/bin/catalina.sh
ADD server.xml /app/tomcat/conf/server.xml
ADD run_tomcat.sh /app/tomcat/bin/run_tomcat.sh
ADD filebeat.yml /etc/filebeat/filebeat.yml
RUN chown -R tomcat.tomcat /app/ && \
rm -f /tmp/filebeat-7.14.0-amd64.deb

EXPOSE 8080 8443

CMD ["/app/tomcat/bin/run_tomcat.sh"]

# 容器里Tomcat和filebeat服务启动脚本
root@k8s-master-32:~# cat run_tomcat.sh
#!/bin/bash

/usr/share/filebeat/bin/filebeat -e -c /etc/filebeat/filebeat.yml -path.home /usr/share/filebeat -path.config /etc/filebeat -path.data /var/lib/filebeat -path.logs /var/log/filebeat &
su - tomcat -c "/app/tomcat/bin/catalina.sh start"
tail -f /etc/hosts

# 制作镜像文件的脚步
root@k8s-master-32:~# cat build-command.sh
#!/bin/bash
TAG=$1
docker build -t 10.200.17.42/tomcat/tomcat-app2:${TAG} .
sleep 3
docker push 10.200.17.42/tomcat/tomcat-app2:${TAG}

filebeat配置文件

1
2
3
4
5
6
7
8
9
10
11
12
13
14
15
16
17
18
19
20
21
22
23
24
25
26
27
28
# filebeat.yml
root@k8s-master-32:~# cat filebeat.yml
filebeat.inputs:
- type: log
enabled: true
paths:
- /app/tomcat/logs/catalina.out
fields:
type: filebeat-tomcat-catalina
- type: log
enabled: true
paths:
- /app/tomcat/logs/localhost_access_log.*.txt
fields:
type: filebeat-tomcat-accesslog
filebeat.config.modules:
path: ${path.config}/modules.d/*.yml
reload.enabled: false
setup.template.settings:
index.number_of_shards: 1
setup.kibana:

output.kafka:
hosts: ["10.200.17.54:9092"]
required_acks: 1
topic: "filebeat-dklwj-app1"
compression: gzip
max_message_bytes: 1000000

这里的catalina.sh和server.xml里的内容过多就不展示了,这两块根据个人习惯修改相关配置即可

1
2
3
4
5
6
7
8
9
10
11
12
13
14
15
16
17
18
19
20
21
22
23
24
25
26
27
28
29
30
31
32
33
34
35
36
37
38
39
40
41
42
43
44
45
46
47
48
49
50
51
52
53
54
root@k8s-master-32:~# bash build-command.sh 2025051616
DEPRECATED: The legacy builder is deprecated and will be removed in a future release.
Install the buildx component to build images with BuildKit:
https://docs.docker.com/go/buildx/

Sending build context to Docker daemon 35.38MB
Step 1/10 : FROM 10.200.17.42/base-image/tomcat-base:8.5.100
---> c68f2a5a4267
Step 2/10 : ADD filebeat-7.14.0-amd64.deb /tmp/
---> Using cache
---> 24e2fdf3320e
Step 3/10 : RUN cd /tmp && dpkg -i filebeat-7.14.0-amd64.deb
---> Using cache
---> 5ccdfaf1efb4
Step 4/10 : ADD catalina.sh /app/tomcat/bin/catalina.sh
---> Using cache
---> eb3063a8ebb4
Step 5/10 : ADD server.xml /app/tomcat/conf/server.xml
---> Using cache
---> 16a3cfcc908c
Step 6/10 : ADD run_tomcat.sh /app/tomcat/bin/run_tomcat.sh
---> Using cache
---> 3c1268ce2ff9
Step 7/10 : ADD filebeat.yml /etc/filebeat/filebeat.yml
---> Using cache
---> 1f7e914bfd77
Step 8/10 : RUN chown -R tomcat.tomcat /app/ && rm -f /tmp/filebeat-7.14.0-amd64.deb
---> Using cache
---> ddecbe186435
Step 9/10 : EXPOSE 8080 8443
---> Using cache
---> 01a73e9d4b6e
Step 10/10 : CMD ["/app/tomcat/bin/run_tomcat.sh"]
---> Using cache
---> e4dd2b86d951
Successfully built e4dd2b86d951
Successfully tagged 10.200.17.42/tomcat/tomcat-app2:2025051616
The push refers to repository [10.200.17.42/tomcat/tomcat-app2]
cd692b857701: Layer already exists
dd4cd7b6ee42: Layer already exists
4f81f81392c8: Layer already exists
1e8c4253c1e1: Layer already exists
b27c6048ac09: Layer already exists
944ab5acbf7a: Layer already exists
03b89b53556d: Layer already exists
763993b152ee: Layer already exists
1d1b65e1037f: Layer already exists
dfd9c0676904: Layer already exists
685eccd84414: Layer already exists
e3403a6fb0cd: Layer already exists
d5b7dcbcb42c: Layer already exists
3be2a52cfd08: Layer already exists
fffe76c64ef2: Layer already exists
2025051616: digest: sha256:d87497162a2da3fb7bcd949c5fb566b095a1ec589a2e720e356a1b5d2d27ee59 size: 3471

测试镜像

Docker镜像制作完成后不要立马用在k8s里,需要保持一个良好的习惯,测试制作好的镜像是否可以正常运行起来,测试没问题后再往k8s里跑

1
2
3
4
5
6
7
8
9
10
root@k8s-master-32:~# docker run --rm  10.200.17.42/tomcat/tomcat-app2:2025051616 
Tomcat started.
127.0.0.1 localhost
::1 localhost ip6-localhost ip6-loopback
fe00::0 ip6-localnet
ff00::0 ip6-mcastprefix
ff02::1 ip6-allnodes
ff02::2 ip6-allrouters
172.17.0.2 a86b61b6b331
....

接入k8s

镜像文件制作好经过测试后没问题了接下来就让它在k8s里去运行即可

编写yaml文件

1
2
3
4
5
6
7
8
9
10
11
12
13
14
15
16
17
18
19
20
21
22
23
24
25
26
27
28
29
30
31
32
33
34
35
36
37
38
39
40
41
42
43
44
45
46
47
48
49
50
51
52
53
54
55
56
57
58
59
60
61
62
63
64
65
66
67
68
69
70
71
72
73
74
75
76
root@k8s-master-32:~# vim 3.tomcat-app1.yaml
kind: Deployment
#apiVersion: extensions/v1beta1
apiVersion: apps/v1
metadata:
labels:
app: dklwj-tomcat-app1-filebeat-deployment-label
name: dklwj-tomcat-app1-filebeat-deployment
namespace: dev
spec:
replicas: 3
selector:
matchLabels:
app: dklwj-tomcat-app1-filebeat-selector
template:
metadata:
labels:
app: dklwj-tomcat-app1-filebeat-selector
spec:
containers:
- name: dklwj-tomcat-app1-filebeat-container
image: 10.200.17.42/tomcat/tomcat-app2:2025051616
#imagePullPolicy: IfNotPresent
imagePullPolicy: Always
ports:
- containerPort: 8080
protocol: TCP
name: http
env:
- name: "password"
value: "123456"
- name: "age"
value: "18"
resources:
limits:
cpu: 1
memory: "512Mi"
requests:
cpu: 500m
memory: "512Mi"
# service.yml
root@k8s-master-32:~# cat 4.tomcat-service.yaml
---
kind: Service
apiVersion: v1
metadata:
labels:
app: dklwj-tomcat-app1-filebeat-service-label
name: dklwj-tomcat-app1-filebeat-service
namespace: dev
spec:
type: NodePort
ports:
- name: http
port: 80
protocol: TCP
targetPort: 8080
nodePort: 30092
selector:
app: dklwj-tomcat-app1-filebeat-selector
#
root@k8s-master-32:/app/yaml/20220529/ELK cases/3.container-filebeat-process# kubectl apply -f 3.tomcat-app1.yaml
deployment.apps/dklwj-tomcat-app1-filebeat-deployment created
root@k8s-master-32:/app/yaml/20220529/ELK cases/3.container-filebeat-process# kubectl apply -f 4.tomcat-service.yaml
service/dklwj-tomcat-app1-filebeat-service created
# 查看pod状态
NAME READY STATUS RESTARTS AGE
dklwj-consumer-deployment-5c88995779-8mvlk 1/1 Running 2 (7h53m ago) 19d
dklwj-consumer-deployment-5c88995779-lk5fn 1/1 Running 2 (7h53m ago) 19d
dklwj-consumer-deployment-5c88995779-qfvn8 1/1 Running 2 (7h53m ago) 19d
dklwj-provider-deployment-7bc88989bb-2m8t5 1/1 Running 2 (7h53m ago) 19d
dklwj-provider-deployment-7bc88989bb-lhmtm 1/1 Running 2 (7h53m ago) 19d
dklwj-provider-deployment-7bc88989bb-rlx6r 1/1 Running 2 (7h53m ago) 19d
dklwj-tomcat-app1-filebeat-deployment-56488b9d77-9mc6t 1/1 Running 0 5s
dklwj-tomcat-app1-filebeat-deployment-56488b9d77-bhn49 1/1 Running 0 7s
dklwj-tomcat-app1-filebeat-deployment-56488b9d77-gkd4l 1/1 Running 0 6s

验证服务

在验证前需要在haproxy负载上配置一个代理这样方便测试

1
2
3
4
5
6
7
8
9
10
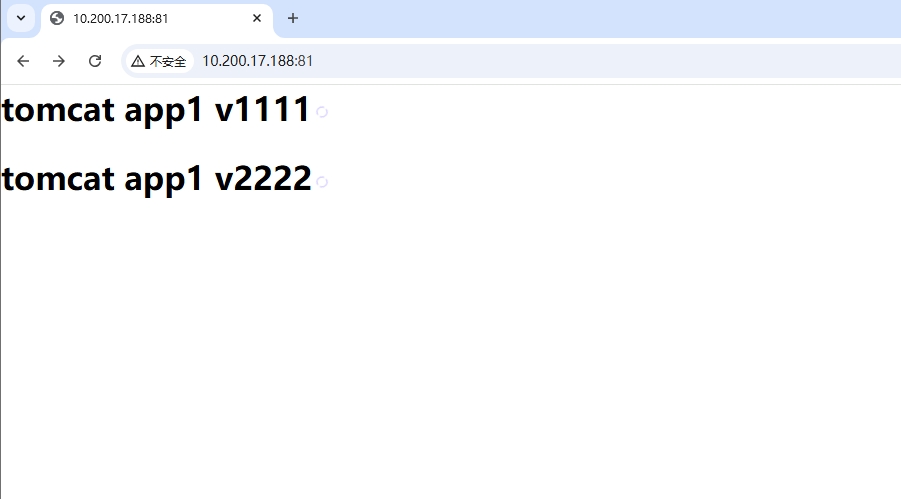
root@k8s-vip-41:~# vim /etc/haproxy/haproxy.cfg
listen web2-tomcat
bind 10.200.17.188:81
mode http
balance roundrobin
server 10.200.17.38 10.200.17.38:30092 check inter 2s fall 3 rise 5
server 10.200.17.39 10.200.17.39:30092 check inter 2s fall 3 rise 5
server 10.200.17.40 10.200.17.40:30092 check inter 2s fall 3 rise 5
# 重启haproxy
root@k8s-vip-41:~# systemctl restart haproxy

重启好后打开浏览器访问业务地址让它产生一些访问日志,后面好配置ELK收集日志

随后打开kafka的客户端工具看下产生的日志是否被收入到里头并产生

配置logstash

日志顺利收集到kafka里后,需要从kafka里把日志读取出来通过logstash解析后输出至ES通过kibana展示

1
2
3
4
5
6
7
8
9
10
11
12
13
14
15
16
17
18
19
20
21
22
23
24
25
26
27
28
29
30
31
32
33
34
35
36
37
38
39
40
41
42
43
44
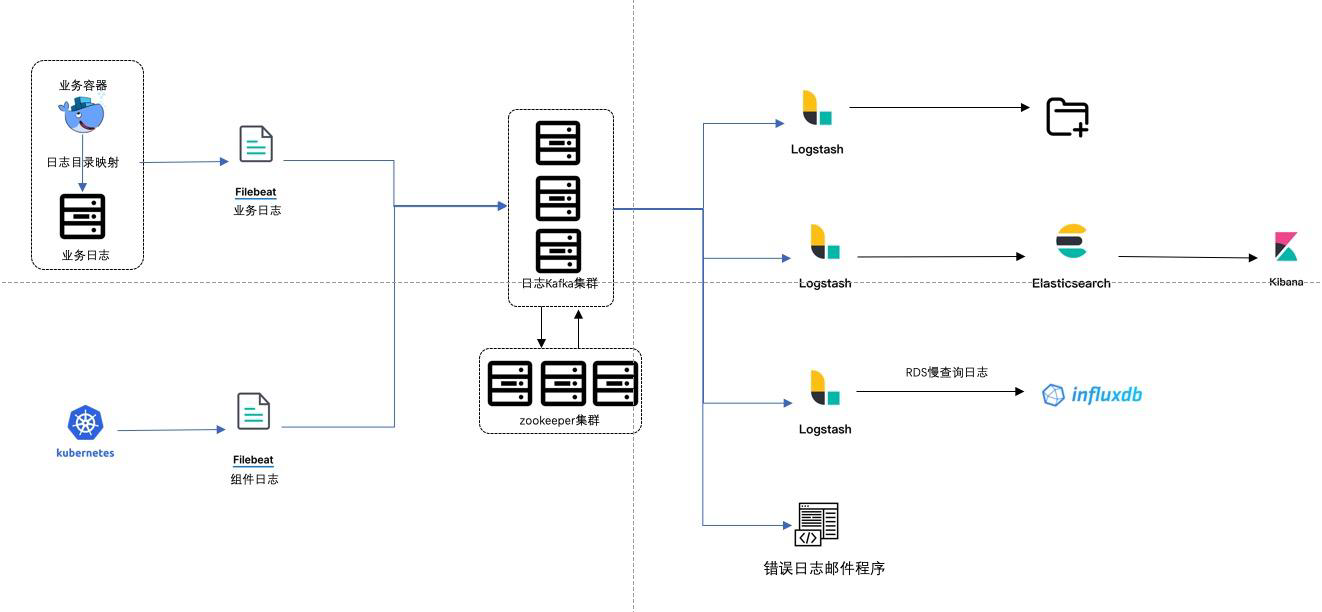
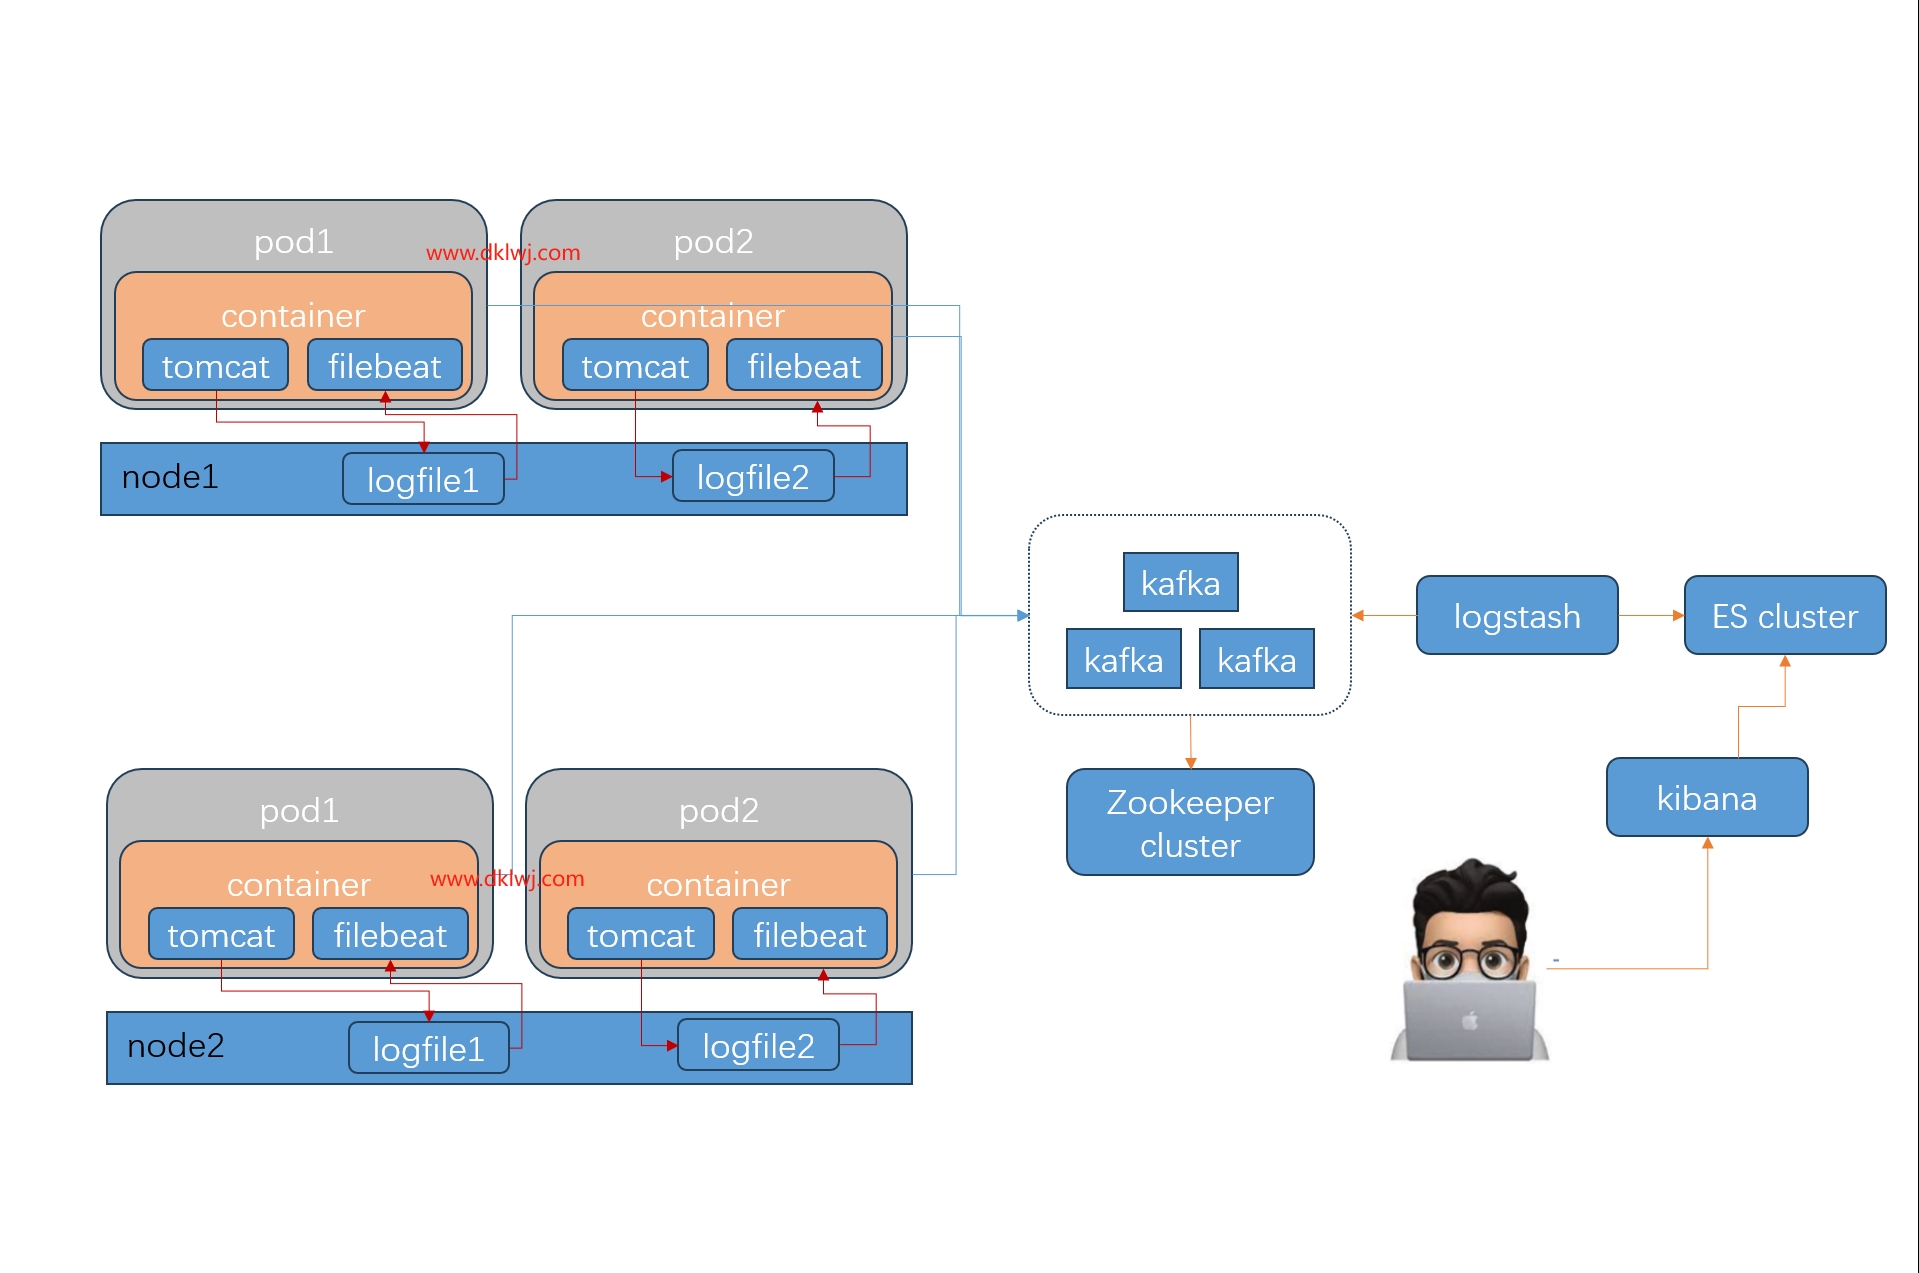
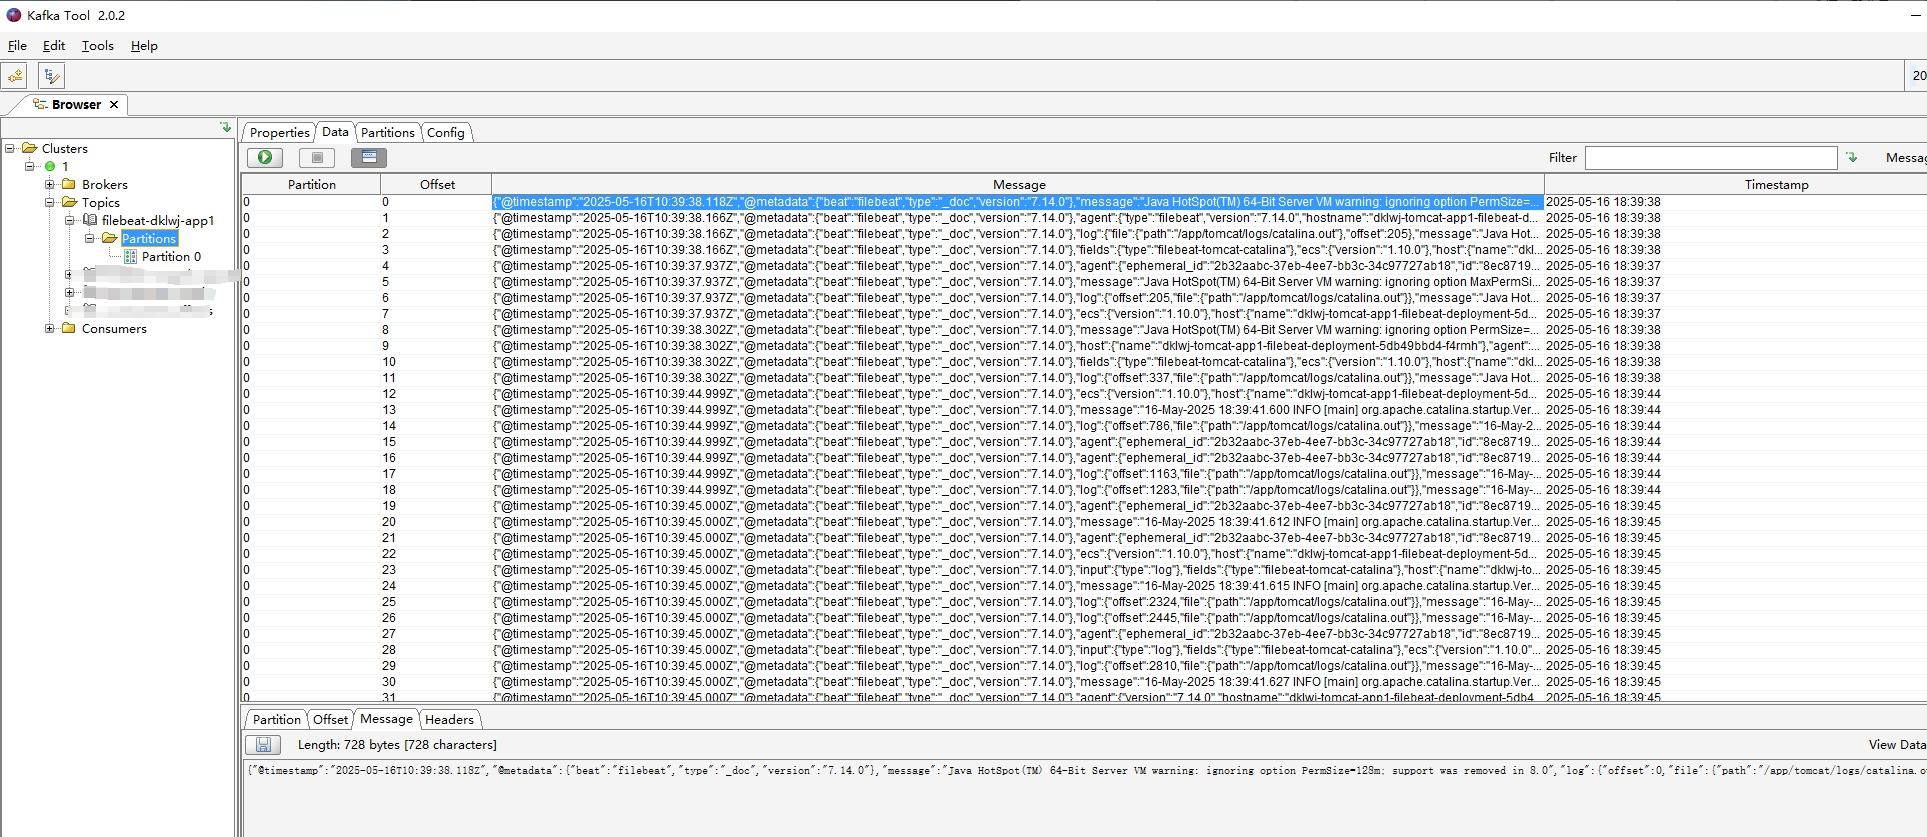
root@logstash-50:/etc/logstash/conf.d# cd 
root@logstash-50:~# cd /etc/logstash/conf.d/
root@logstash-50:/etc/logstash/conf.d# vim filebeat-kafka-to-logstash-es.conf
input {
kafka {
bootstrap_servers => "10.200.17.54:9092,10.200.17.55:9092,10.200.17.56:9092"
topics => ["filebeat-magedu-app1"]
codec => "json"
}
}


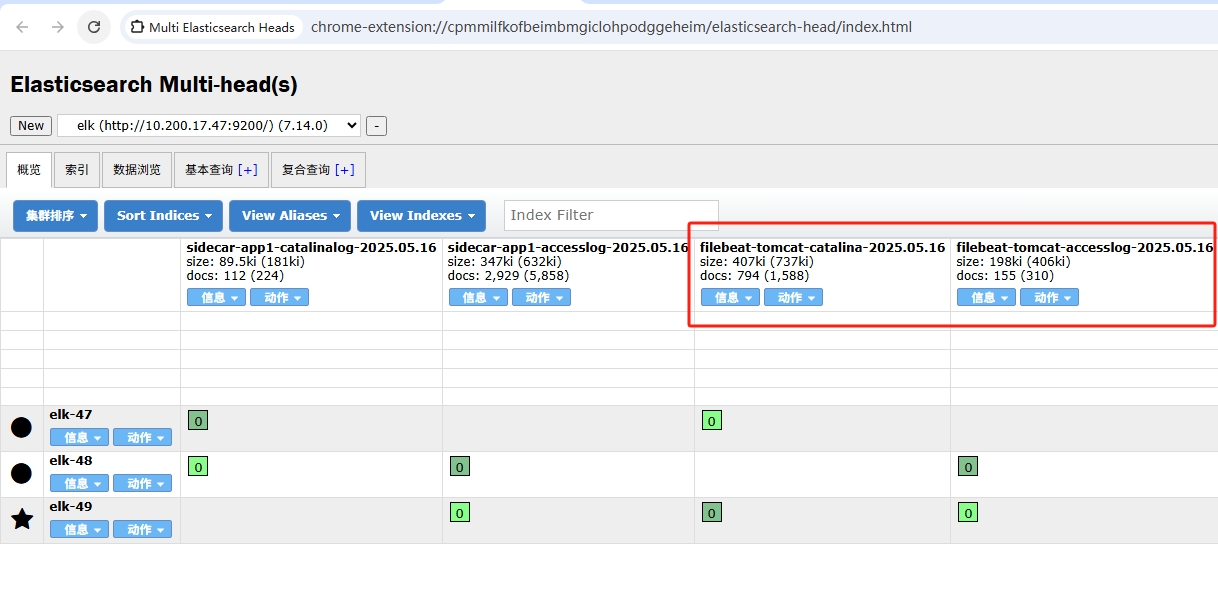
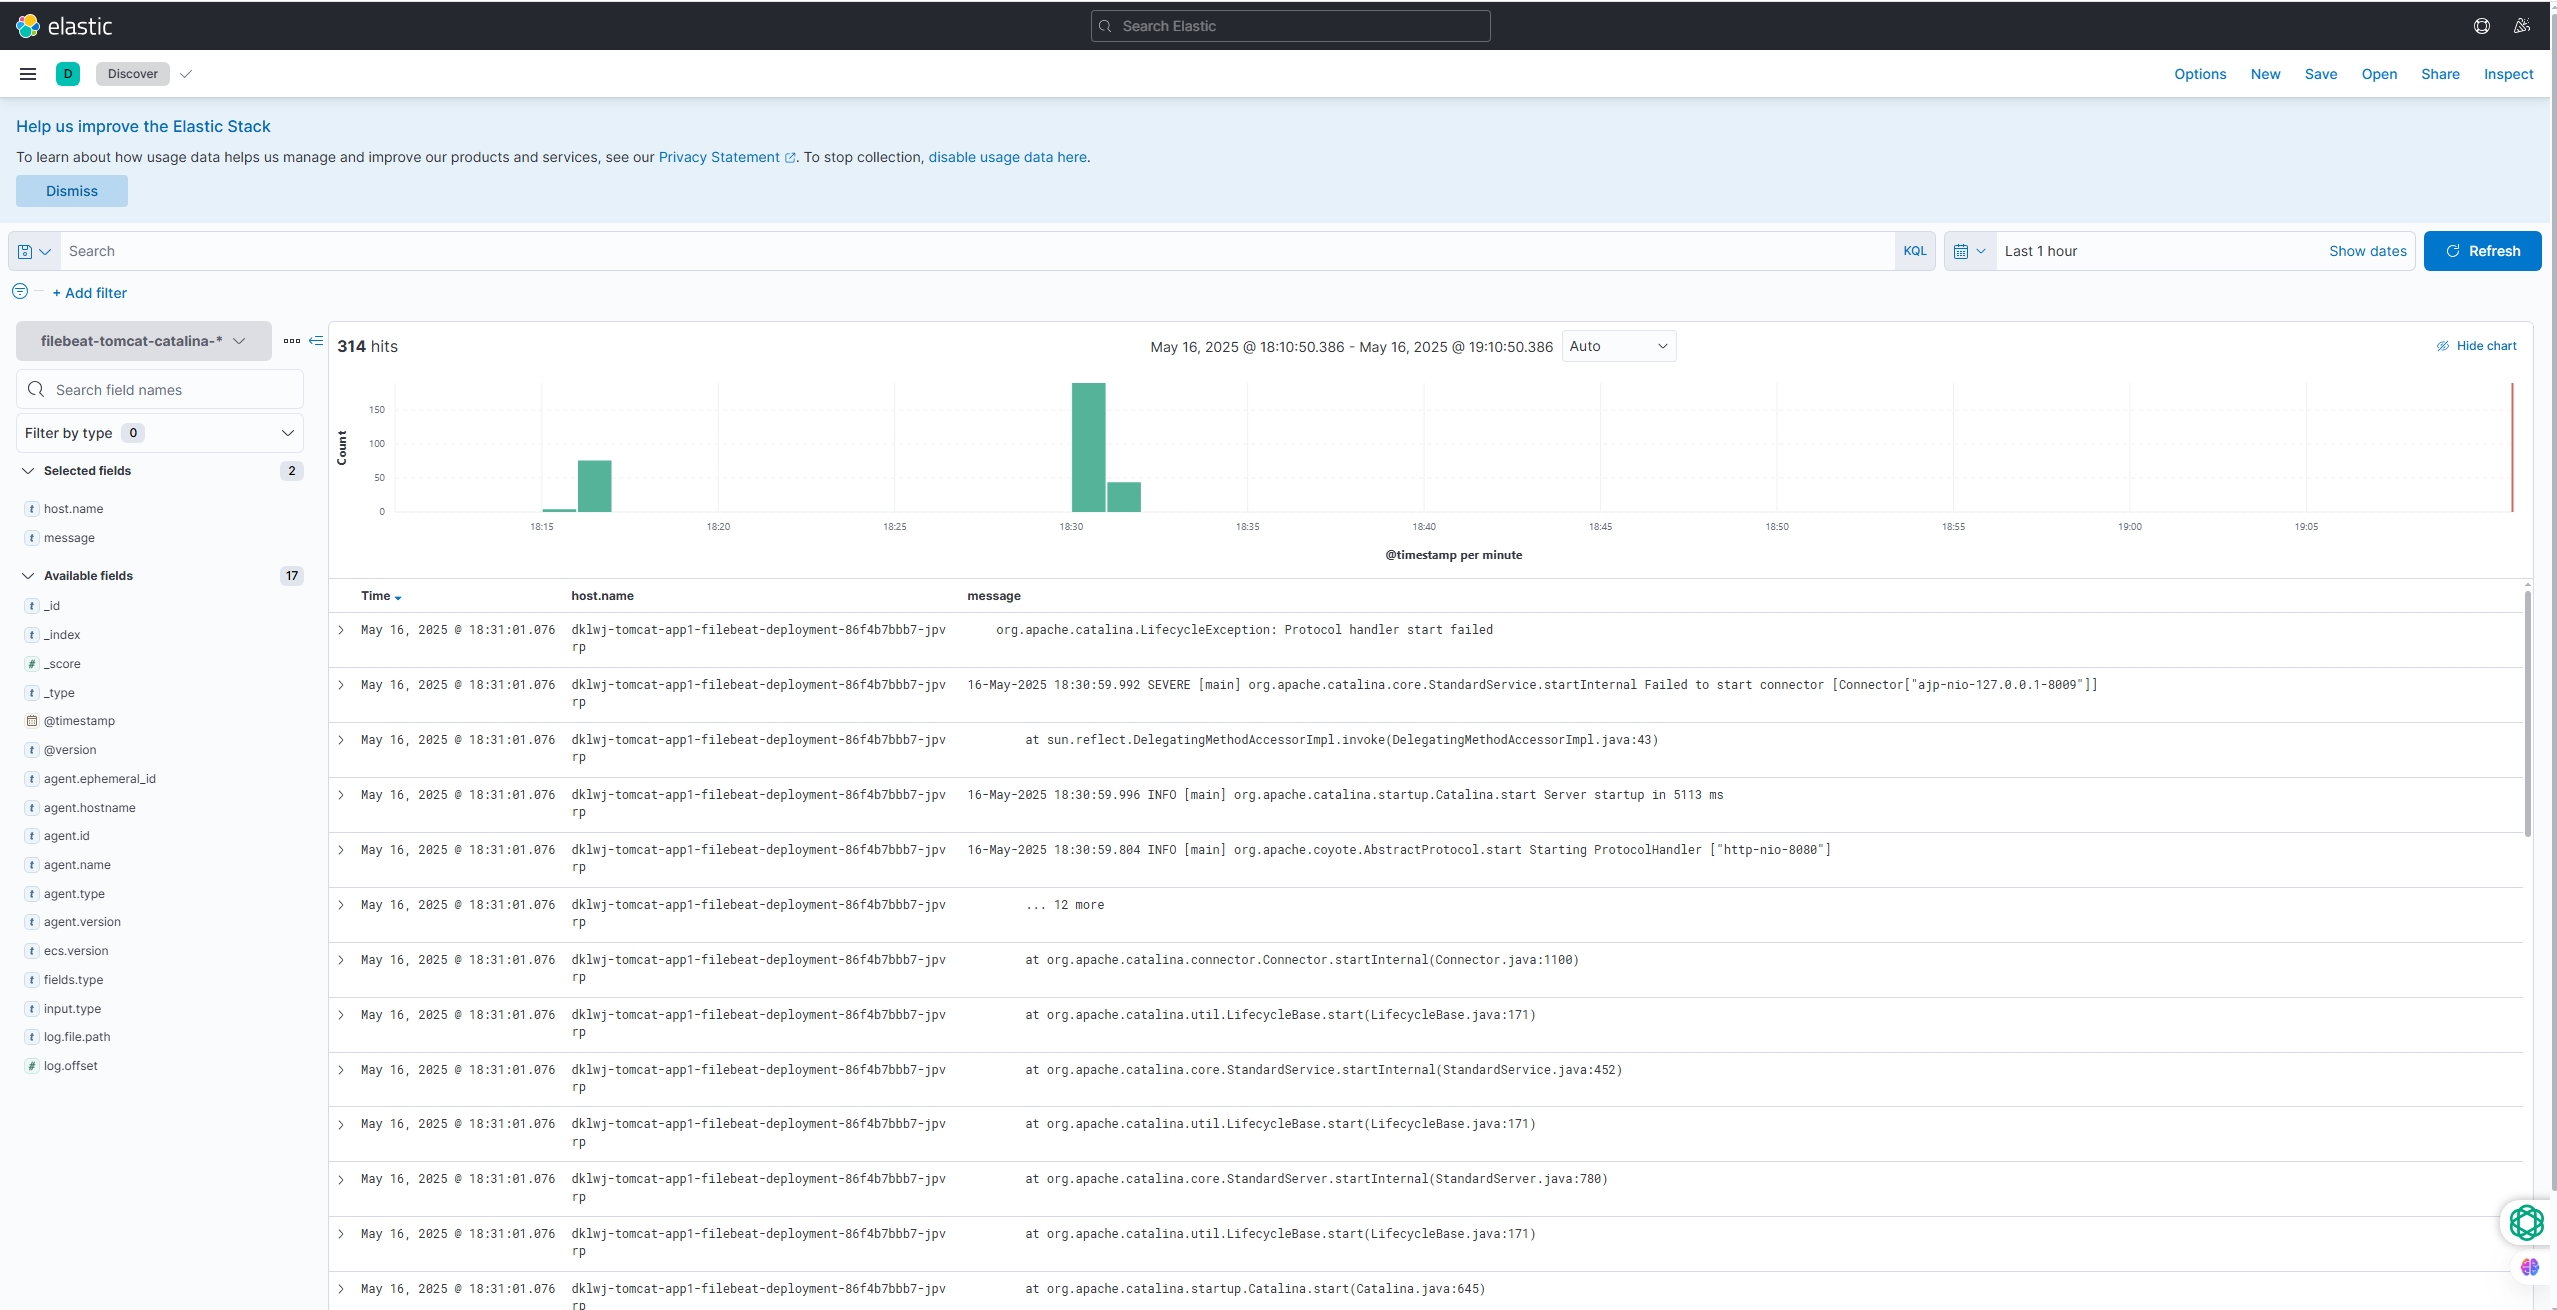
output {
if [fields][type] == "filebeat-tomcat-catalina" {
elasticsearch {
hosts => ["10.200.17.47:9200","10.200.17.48:9200"]
index => "filebeat-tomcat-catalina-%{+YYYY.MM.dd}"
}}

if [fields][type] == "filebeat-tomcat-accesslog" {
elasticsearch {
hosts => ["10.200.17.47:9200","10.200.17.48:9200"]
index => "filebeat-tomcat-accesslog-%{+YYYY.MM.dd}"
}}

}
# 检查下配置文件是否有误
root@logstash-50:/etc/logstash/conf.d# /usr/share/logstash/bin/logstash -f ./filebeat-kafka-to-logstash-es.conf -t
Using bundled JDK: /usr/share/logstash/jdk
OpenJDK 64-Bit Server VM warning: Option UseConcMarkSweepGC was deprecated in version 9.0 and will likely be removed in a future release.
/usr/share/logstash/vendor/bundle/jruby/2.5.0/gems/bundler-1.17.3/lib/bundler/rubygems_integration.rb:200: warning: constant Gem::ConfigMap is deprecated
WARNING: Could not find logstash.yml which is typically located in $LS_HOME/config or /etc/logstash. You can specify the path using --path.settings. Continuing using the defaults
Could not find log4j2 configuration at path /usr/share/logstash/config/log4j2.properties. Using default config which logs errors to the console
[INFO ] 2025-05-16 10:55:39.862 [main] runner - Starting Logstash {"logstash.version"=>"7.14.0", "jruby.version"=>"jruby 9.2.19.0 (2.5.8) 2021-06-15 55810c552b OpenJDK 64-Bit Server VM 11.0.11+9 on 11.0.11+9 +indy +jit [linux-x86_64]"}
[WARN ] 2025-05-16 10:55:40.226 [LogStash::Runner] multilocal - Ignoring the 'pipelines.yml' file because modules or command line options are specified
[INFO ] 2025-05-16 10:55:41.244 [LogStash::Runner] Reflections - Reflections took 140 ms to scan 1 urls, producing 120 keys and 417 values
[WARN ] 2025-05-16 10:55:42.212 [LogStash::Runner] elasticsearch - Relying on default value of `pipeline.ecs_compatibility`, which may change in a future major release of Logstash. To avoid unexpected changes when upgrading Logstash, please explicitly declare your desired ECS Compatibility mode.
[WARN ] 2025-05-16 10:55:42.253 [LogStash::Runner] elasticsearch - Relying on default value of `pipeline.ecs_compatibility`, which may change in a future major release of Logstash. To avoid unexpected changes when upgrading Logstash, please explicitly declare your desired ECS Compatibility mode.
Configuration OK
[INFO ] 2025-05-16 10:55:42.272 [LogStash::Runner] runner - Using config.test_and_exit mode. Config Validation Result: OK. Exiting Logstash
# 启动logstash服务
root@logstash-50:/etc/logstash/conf.d# systemctl restart logstash.service

查看ES数据

logstash配置好之后没问题的话,它里面的日志信息已经到了ES里了,这时候借助ES插件先看下相关的索引信息有没有进来,有了之后开始进入kibana界面配置索引即可

配置kibana

打开kibana界面后在首页里找到Management–>stack Management–>kibana–>index Patterns –>create index pattern
最终展示如下,后面相关的开发人员就可以在kibana界面上搜索相关业务相关日志信息有助于排查相关问题。


k8s-ELK日志收集实践
https://www.dklwj.com/2025/05/k8s-ELK-log-collection-practice.html
作者
阿伟
发布于
2025年5月16日
许可协议